水平扩展
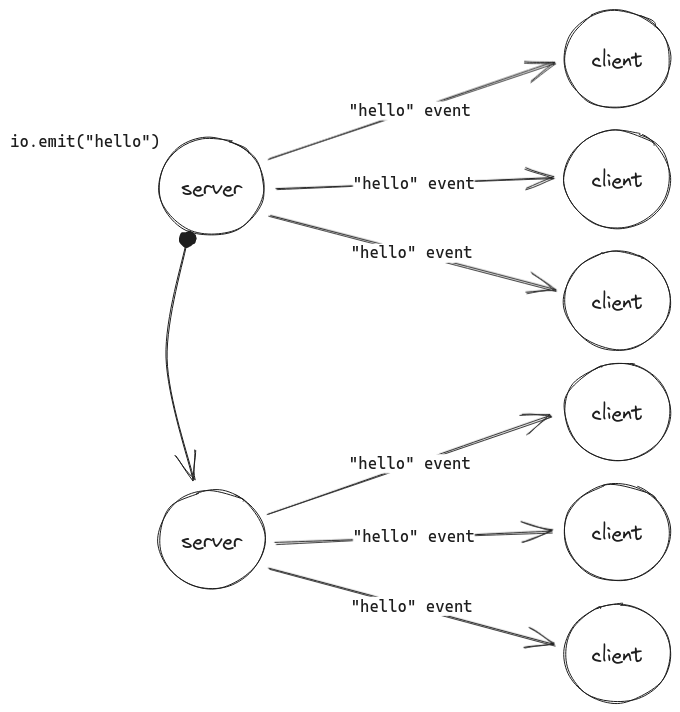
现在我们的应用程序已经能够抵御暂时的网络中断,让我们看看如何水平扩展它,以便能够支持数千个并发客户端。
注意
- 水平扩展(也称为“横向扩展”)意味着向您的基础设施添加新服务器以应对新的需求
- 垂直扩展(也称为“纵向扩展”)意味着向您的现有基础设施添加更多资源(处理能力、内存、存储等)
第一步:让我们使用主机的所有可用核心。默认情况下,Node.js 在单个线程中运行您的 Javascript 代码,这意味着即使使用 32 核 CPU,也只会使用一个核心。幸运的是,Node.js cluster 模块 提供了一种方便的方法来为每个核心创建一个工作线程。
我们还需要一种在 Socket.IO 服务器之间转发事件的方法。我们将此组件称为“适配器”。


所以让我们安装集群适配器
- NPM
- Yarn
- pnpm
npm install @socket.io/cluster-adapter
yarn add @socket.io/cluster-adapter
pnpm add @socket.io/cluster-adapter
现在我们把它插入
- CommonJS
- ES 模块
index.js
const express = require('express');
const { createServer } = require('node:http');
const { join } = require('node:path');
const { Server } = require('socket.io');
const sqlite3 = require('sqlite3');
const { open } = require('sqlite');
const { availableParallelism } = require('node:os');
const cluster = require('node:cluster');
const { createAdapter, setupPrimary } = require('@socket.io/cluster-adapter');

if (cluster.isPrimary) {
  const numCPUs = availableParallelism();
  // create one worker per available core
  for (let i = 0; i < numCPUs; i++) {
    cluster.fork({
      PORT: 3000 + i
    });
  }

  // set up the adapter on the primary thread
  return setupPrimary();
}

async function main() {
  const app = express();
  const server = createServer(app);
  const io = new Server(server, {
    connectionStateRecovery: {},
    // set up the adapter on each worker thread
    adapter: createAdapter()
  });

  // [...]

  // each worker will listen on a distinct port
  const port = process.env.PORT;

  server.listen(port, () => {
    console.log(`server running at https://:${port}`);
  });
}

main();
index.js
import express from 'express';
import { createServer } from 'node:http';
import { Server } from 'socket.io';
import sqlite3 from 'sqlite3';
import { open } from 'sqlite';
import { availableParallelism } from 'node:os';
import cluster from 'node:cluster';
import { createAdapter, setupPrimary } from '@socket.io/cluster-adapter';

if (cluster.isPrimary) {
  const numCPUs = availableParallelism();
  // create one worker per available core
  for (let i = 0; i < numCPUs; i++) {
    cluster.fork({
      PORT: 3000 + i
    });
  }

  // set up the adapter on the primary thread
  setupPrimary();
} else {
  const app = express();
  const server = createServer(app);
  const io = new Server(server, {
    connectionStateRecovery: {},
    // set up the adapter on each worker thread
    adapter: createAdapter()
  });

  // [...]

  // each worker will listen on a distinct port
  const port = process.env.PORT;

  server.listen(port, () => {
    console.log(`server running at https://:${port}`);
  });
}
就是这样!这将在您的机器上为每个可用的 CPU 生成一个工作线程。让我们看看它的运行情况
正如您在地址栏中看到的,每个浏览器选项卡都连接到不同的 Socket.IO 服务器,适配器只是在它们之间转发 chat message 事件。
提示
目前有 5 种官方适配器实现
- the Redis 适配器
- the Redis 流适配器
- the MongoDB 适配器
- the Postgres 适配器
- the 集群适配器
所以您可以选择最适合您需求的适配器。但是,请注意,某些实现不支持连接状态恢复功能,您可以找到兼容性矩阵 这里.
注意
在大多数情况下,您还需要确保 Socket.IO 会话的所有 HTTP 请求都到达同一台服务器(也称为“粘性会话”)。但是,这里不需要这样做,因为每个 Socket.IO 服务器都有自己的端口。
更多信息 这里.
最后,我们的聊天应用程序终于完成了!在本教程中,我们了解了如何
- 在客户端和服务器之间发送事件
- 将事件广播到所有或部分连接的客户端
- 处理临时断开连接
- 扩展
您现在应该对 Socket.IO 提供的功能有更好的了解。现在轮到您构建自己的实时应用程序了!
信息
- CommonJS
- ES 模块
您可以在浏览器中直接运行此示例
您可以在浏览器中直接运行此示例